
Guest post by Tiffany Schmidt of The Learning Effect
Google Classroom is a free tool for schools to manage coursework online. In order to use Google Classroom with students, your school has to be registered for a free G Suite for Education account. If you try to sign up for Google Classroom with a personal Google account, you will receive the following message.
Using Classroom at a school with students? If so, your school must sign up for a free G Suite for Education account before you can use Classroom. Learn More G Suite for Education lets schools decide which Google services their students can use, and provides additional privacy and security protections that are important in a school setting. Students cannot use Google Classroom at a school with personal accounts. Google Classroom
If you do not have access to G Suite for Education at your school, I’ve shared some alternatives to Google Classroom at the end of this post that will help you use Google Drive files with your students.
Google Drive and Google Classroom are NOT the same things. You do not have to have Google Classroom to use Google Drive.
Requirements to Follow This Tutorial
- G Suite for Education account
- Students already registered for your Google Classroom class
- Any Google file that you want to assign to your students – it can be something you’ve created or purchased from TpT (or similar)
1. Sign In to Google Account > Google Drive
Sign in to your school Google account and go to Google Drive. If you need to add a file to your Google Drive, I recommend signing out of other Google accounts for the next step. This will ensure the file is added to the correct account.
2. Add Digital Resource to Drive
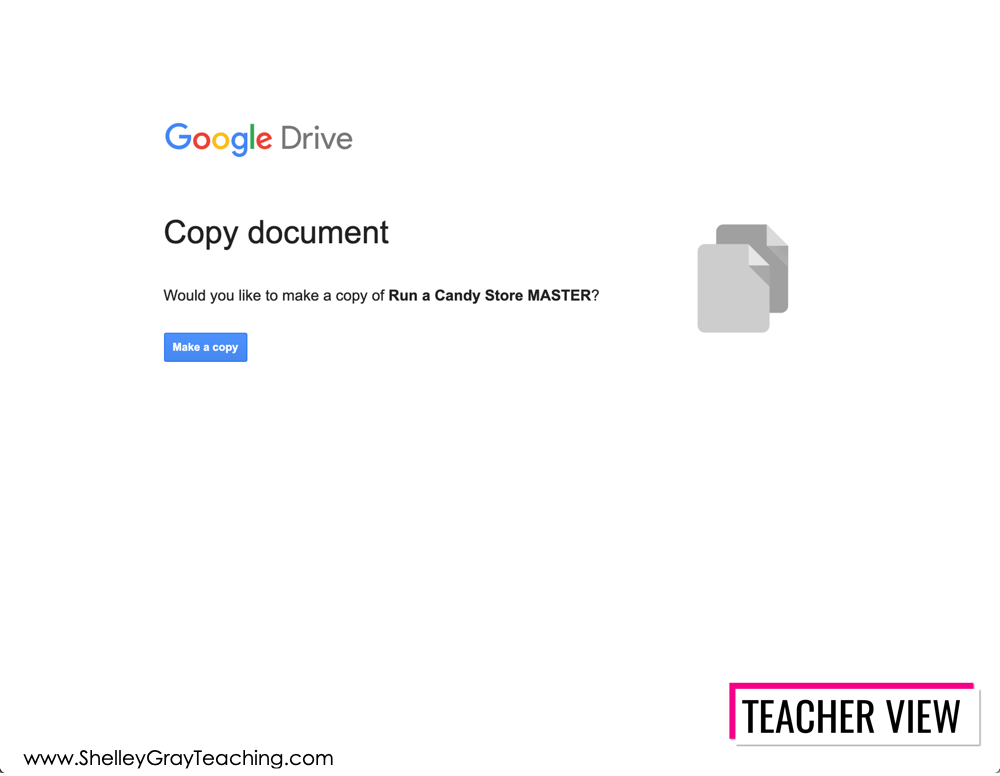
If you have not already added a purchased file to your Google Drive, you need to do that first. All sellers do things a little bit differently, but typically you will get a PDF that contains a link that will have you COPY the file to your Drive. When you click the link, it will open a new tab in your browser. Click MAKE A COPY. By default, the file will save to MY DRIVE (this is the main cloud location located at drive.google.com).
3. Organization System for Drive (Optional)
You may want to consider creating an easy to use organization system within your Google Drive. Simply create a folder for your master copies and one for your edited assignments.
You can always re-download a new copy of a Google resource from TpT if you accidentally use your master copy for an assignment.
Please note: You will have to redownload a new copy if the file is updated. Because you made a copy when you accessed the file the first time, future updates will not be automatic.
4. Open the File and Make a Copy for Your Assignment
Open the file that you want to assign to students and make a copy. Go to FILE > MAKE A COPY > ENTIRE PRESENTATION.
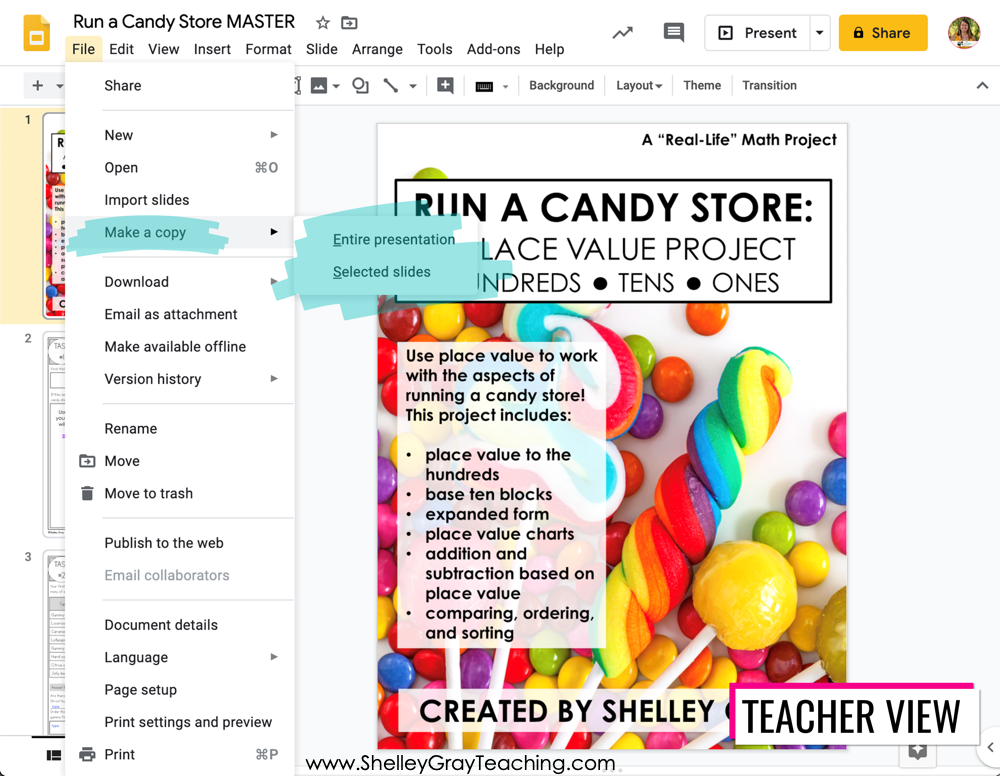
Decide where you want to save your new copy. If you created a folder for assignments, save your copy there. You can also rename the file at this point if you want. (I will show you how to do it another way in the next step.)

5. Rename and Edit New Copy
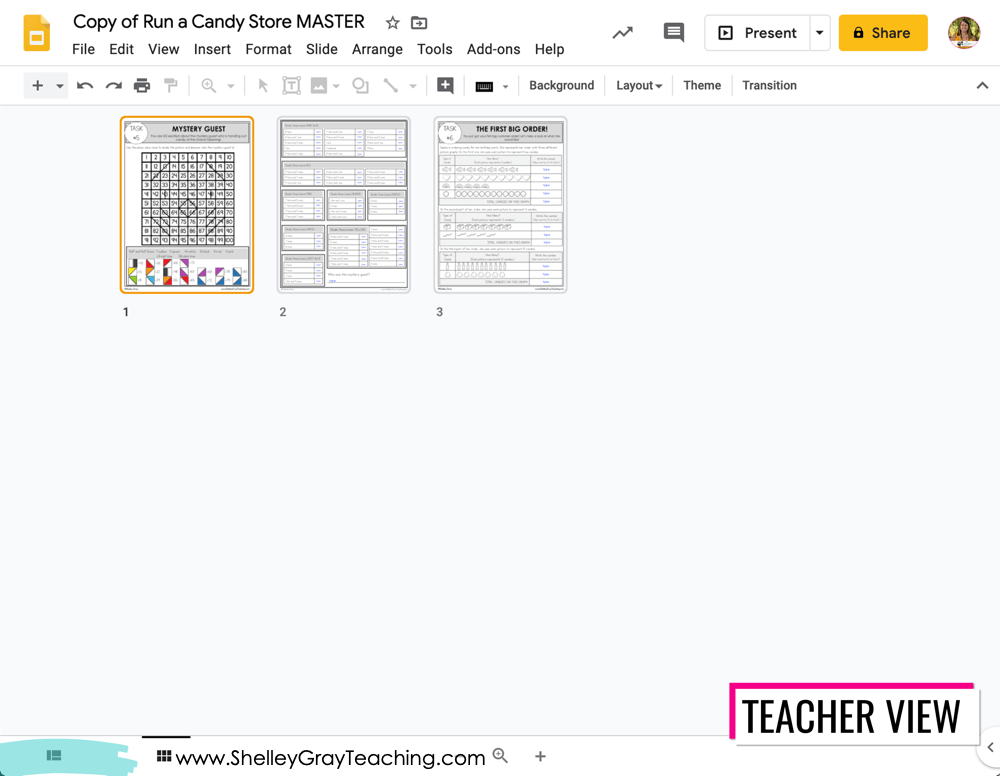
Your copy will open in a new tab. You will know it’s the copy because Google automatically puts “copy of” in front of the file name. Use GRID VIEW to see all pages (highlighted at the bottom of the slide viewer in the screenshot below).

Select any pages that you do not want to include in your assignment and delete them. You can do this by hitting the DELETE key on your keyboard or by right-clicking on one of the selected slides and clicking DELETE on the menu.

Go back to FILMSTRIP VIEW to see one page at a time (highlighted at the bottom of the slide viewer in the screenshot below).
Click on the file name at the top of the screen to rename it. I recommend renaming the file to something that is easy for you and your students to recognize. Your students will see this file name.

If you need to, you can add additional instructions off the side of the page. Select the icon that is a square with a T inside, then click and drag to draw your text box. Anything you type in all students will be able to see.
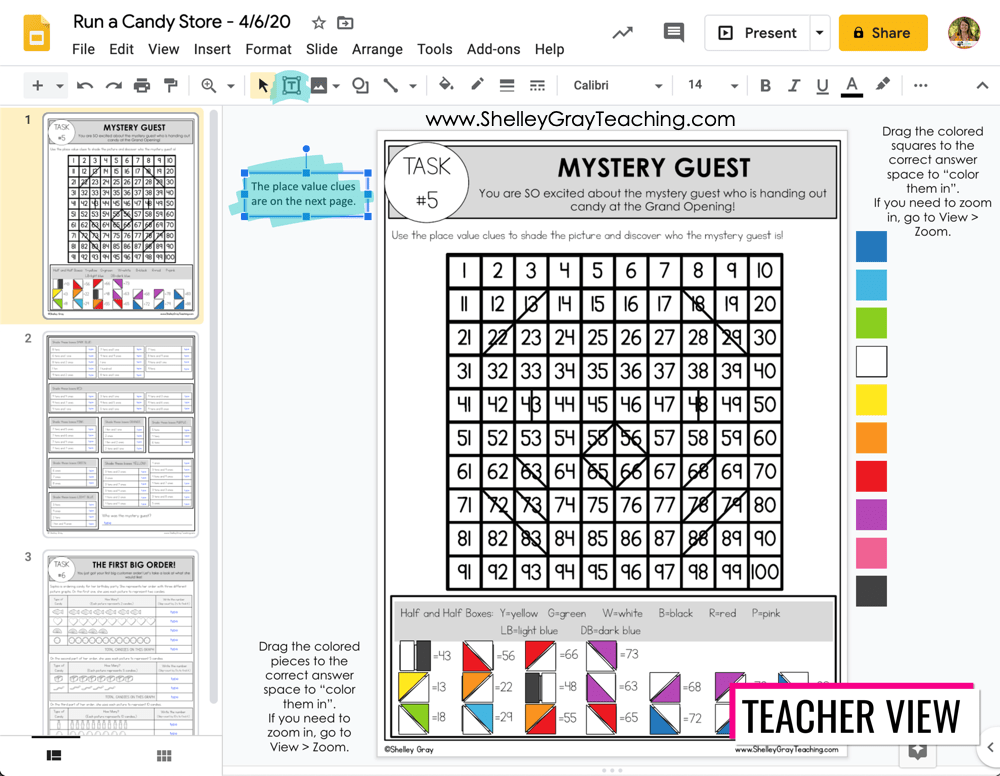
Most TpT Google Drive resources should be in a Google Drive document format already. In Google Slides, students can add text boxes to answer on pages if the seller hasn’t already done so. They can also add shapes, pictures, and more to help them complete their assignment.
6. Open Google Classroom and Create Your Assignment
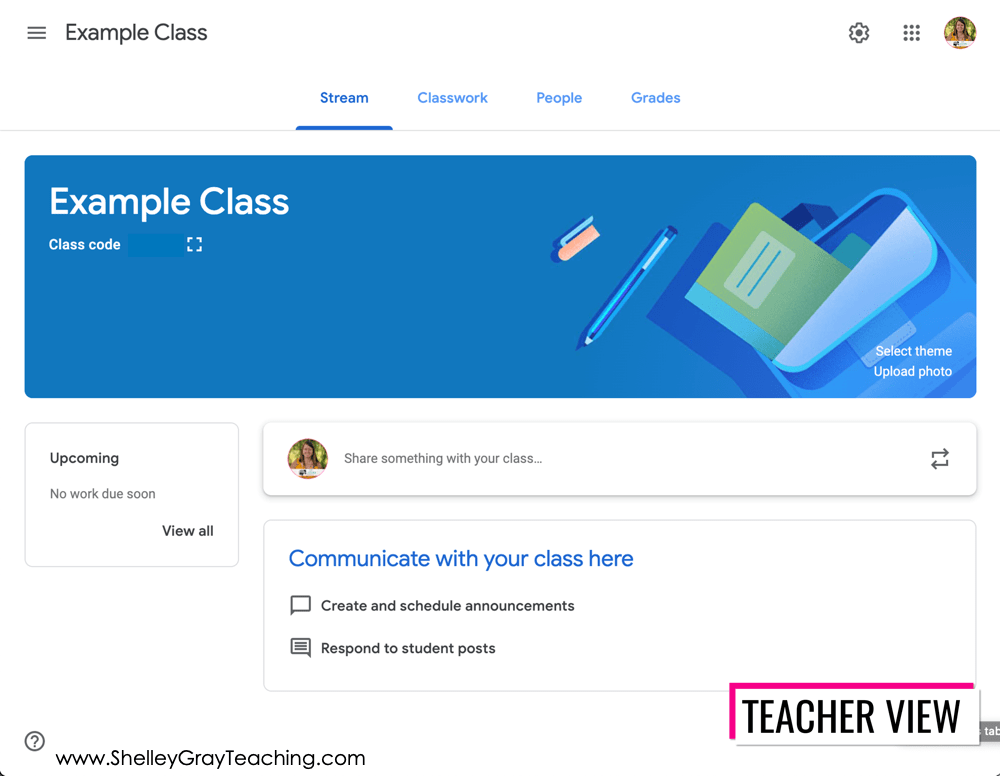
Go to Google Classroom and open the class you want to create the assignment for (if you have more than one).
On your main page is the Stream. Here you can see upcoming assignments, create and schedule announcements, change your class theme, and see your class code. The class code is needed for students to register for your Google Classroom course if they’re not already.
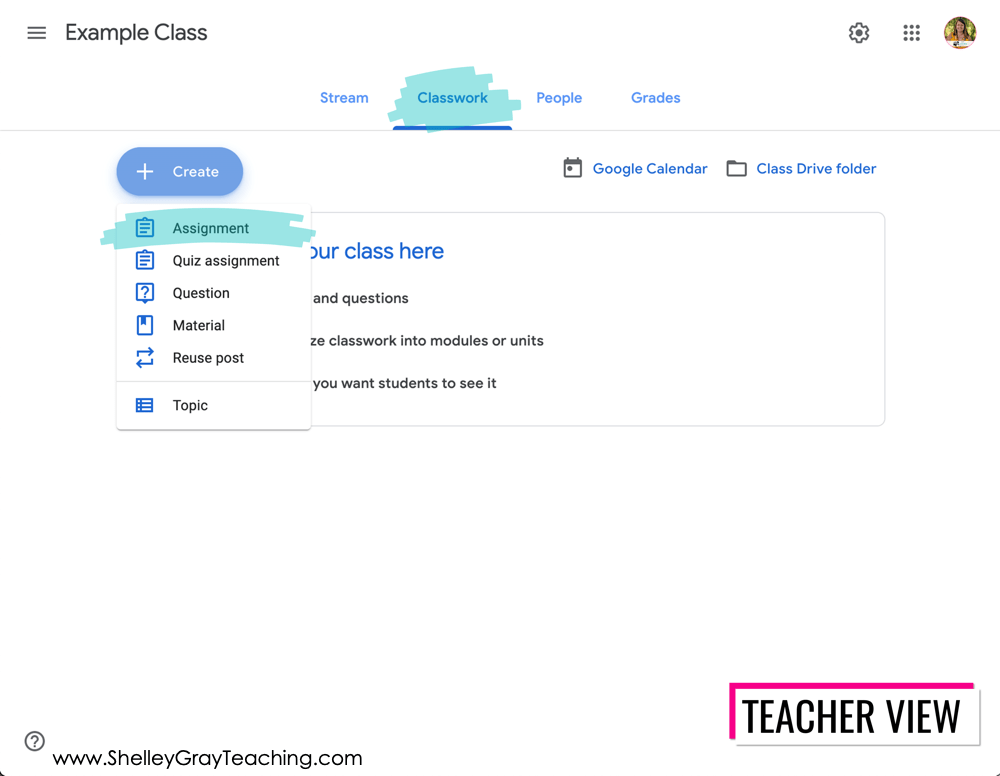
Go to the Classwork tab. Click on CREATE > ASSIGNMENT. Other options include Quiz Assignment (create a quiz using Google Forms), Question (short answer or multiple choice), or Material (something that you want students to have access to, but they don’t need to edit, such as notes, a calendar, etc.). All of these created posts show in your Classwork feed.
Fill in all of the assignment details that you wish to include. Google Classroom automatically saves everything as you work, so you don’t have to worry about losing anything along the way.
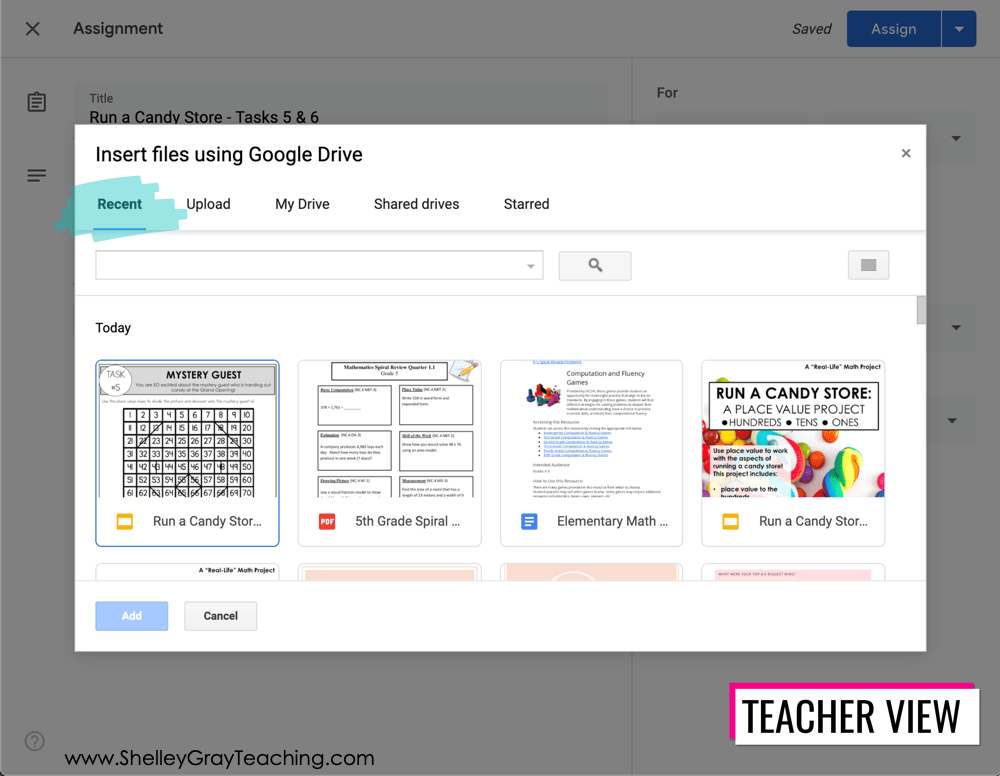
Click ADD > GOOGLE DRIVE to add your file.
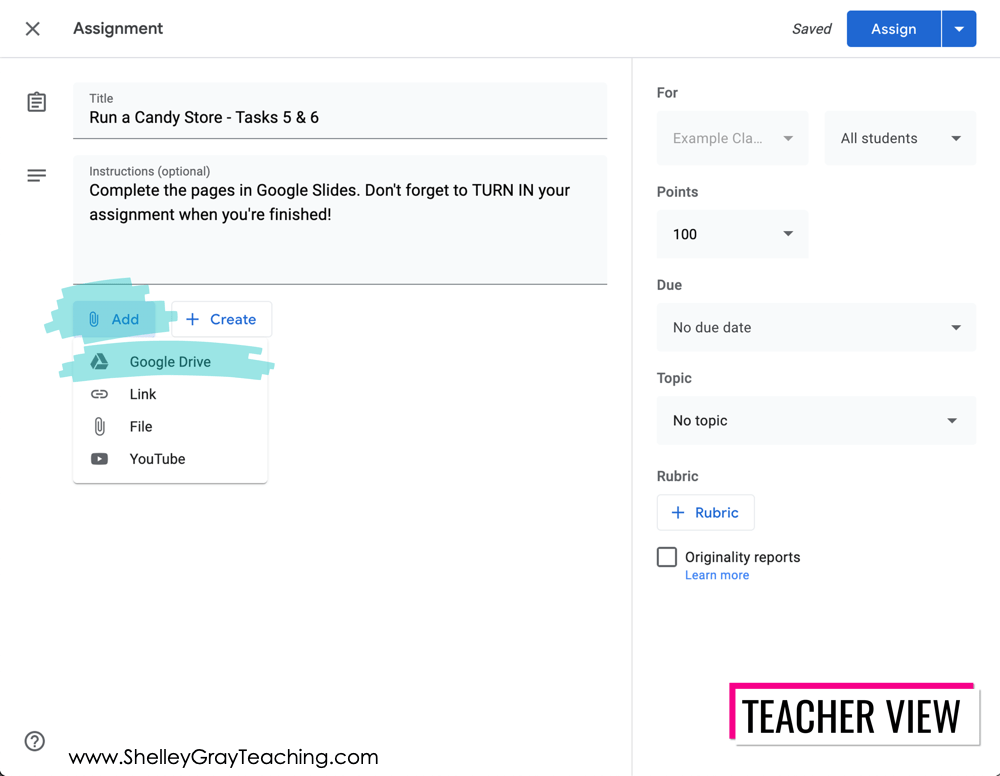
If you recently edited the file, it will come up under RECENT. If not, you can click on MY DRIVE and locate it in the Drive. Select the file and click ADD.
** This next part is VERY IMPORTANT! If you want each student to complete their own copy, you need to change the setting on the file to MAKE A COPY FOR EACH STUDENT. **
If you don’t change this setting, the default is STUDENTS CAN VIEW FILE – they won’t be able to edit anything in the file.
The other option is STUDENTS CAN EDIT FILE – you only want to select this if you want the entire class to edit the same file. Just be warned that if one student deletes something (like a slide), it is deleted for everyone. You can recover the lost work, but it will undo everything that was created after the recovery time.
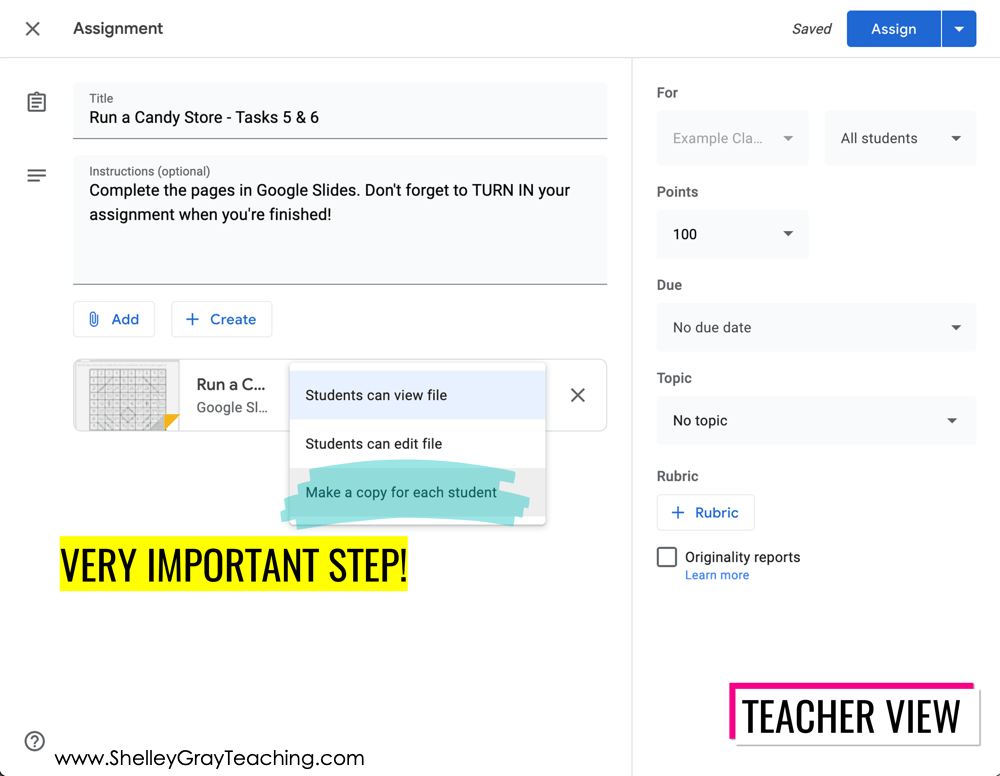
At this point, you can ASSIGN, or click the down arrow next to it for more options. You can schedule for a later date, save your assignment as a draft, or discard the draft.

7. Student View of Assignment
The next few screenshots will give you a glance of what a student’s view is like. They have an upcoming calendar that shows them anything you’ve added to the Classwork page with a due date. New assignments, materials, and announcements will show up in the class Stream. Notice that students can also add to the Stream if you don’t turn this setting off. (I’ll show you how to do this later.)

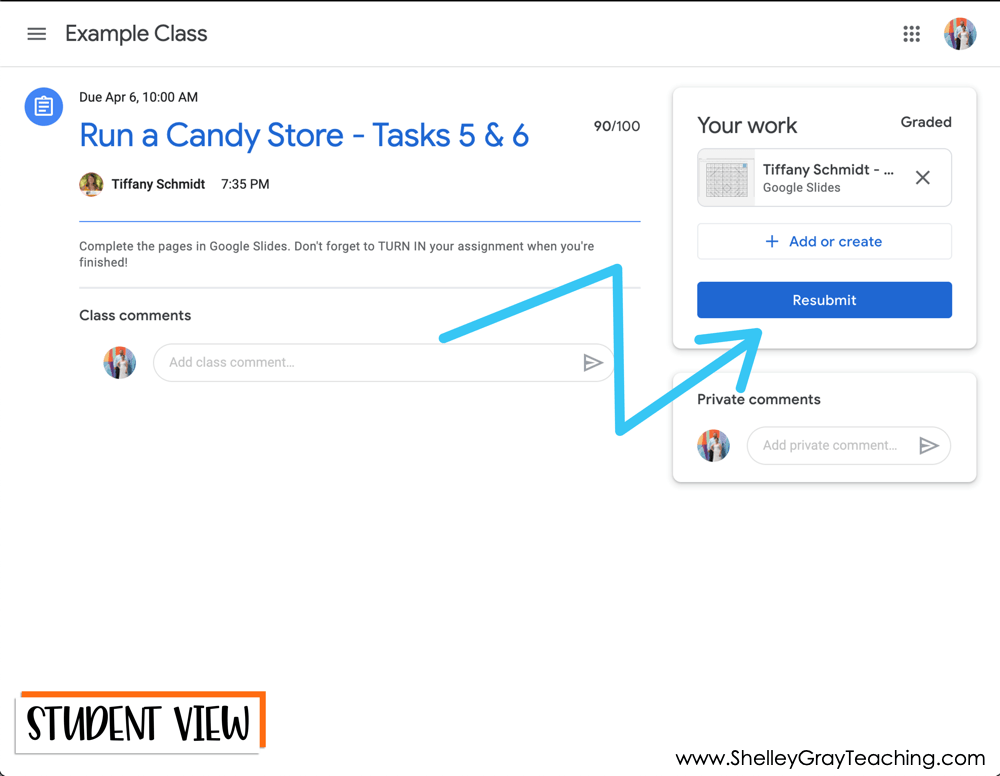
Students can click the assignment for all of the details. This is a student view of an assignment. Notice how the assignment shows the copy you made for the student under the YOUR WORK section. Students can leave a comment on the assignment for the whole class or a private comment that only the teacher can see.
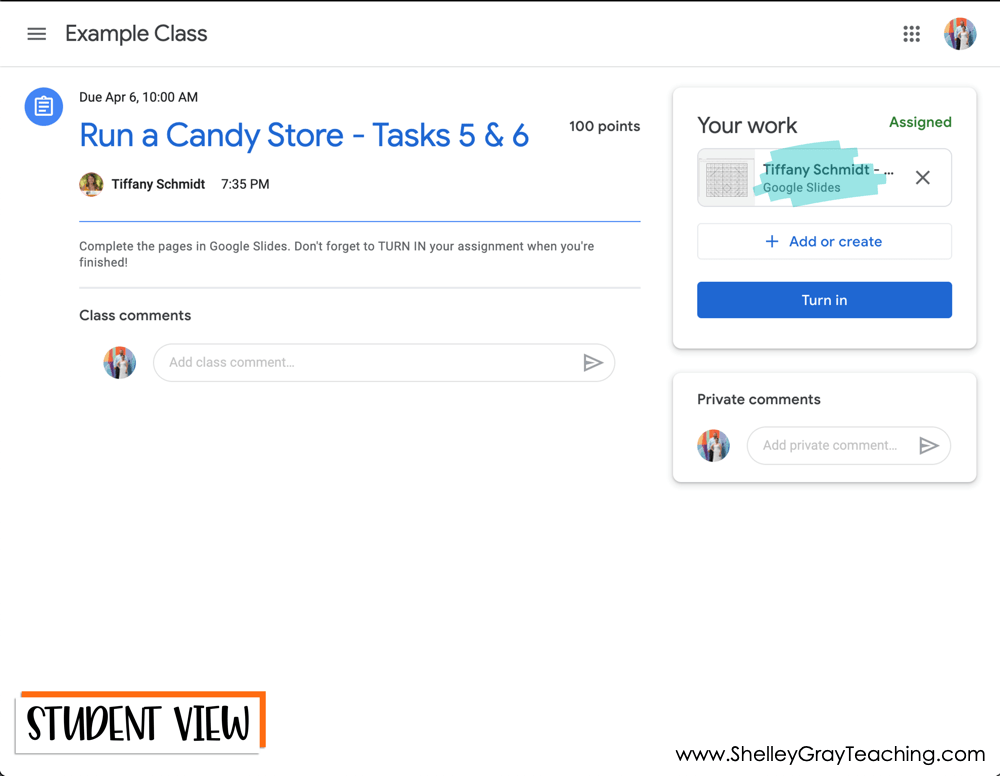
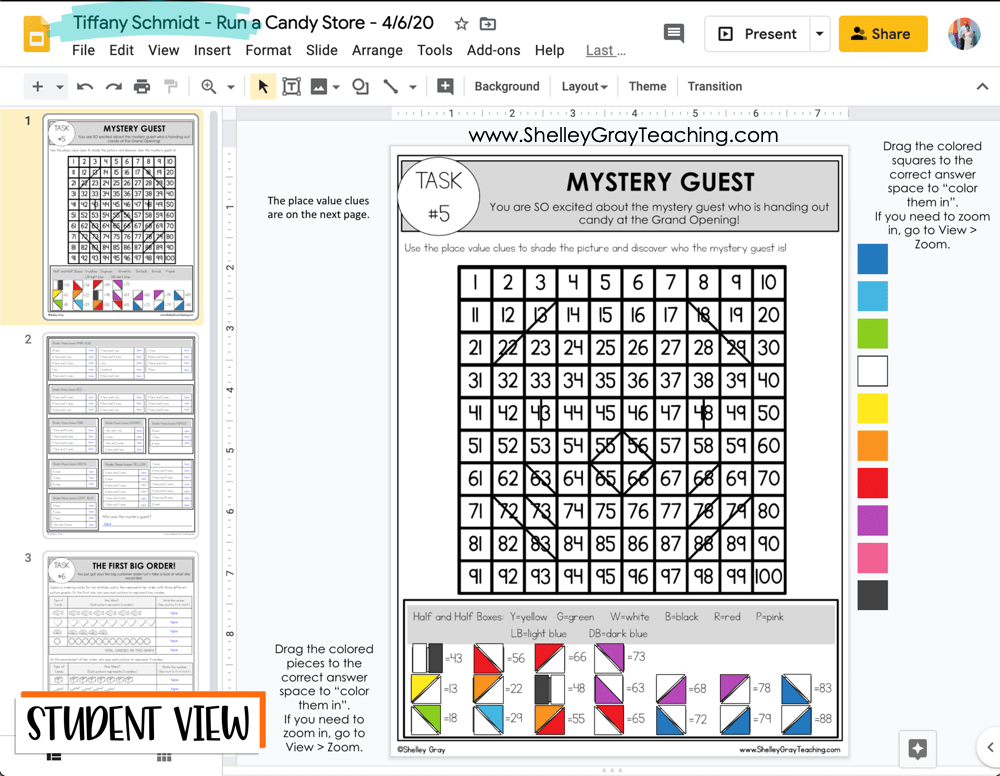
When a student clicks on the file in their assignment, they will see their own copy (if you selected MAKE A COPY FOR EACH STUDENT). Google automatically renames the file copy with the student’s name. So awesome for you!
They complete their work right in the Google Slides file and then TURN IN back on the assignment page.
8. Grading and Sending Back to Student
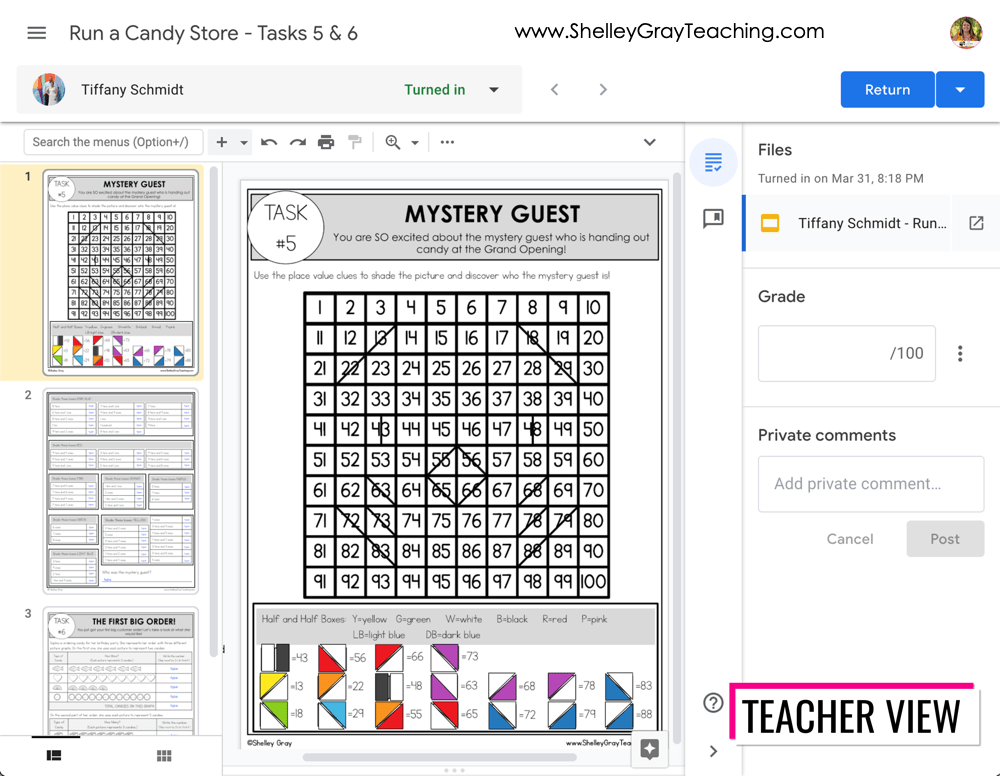
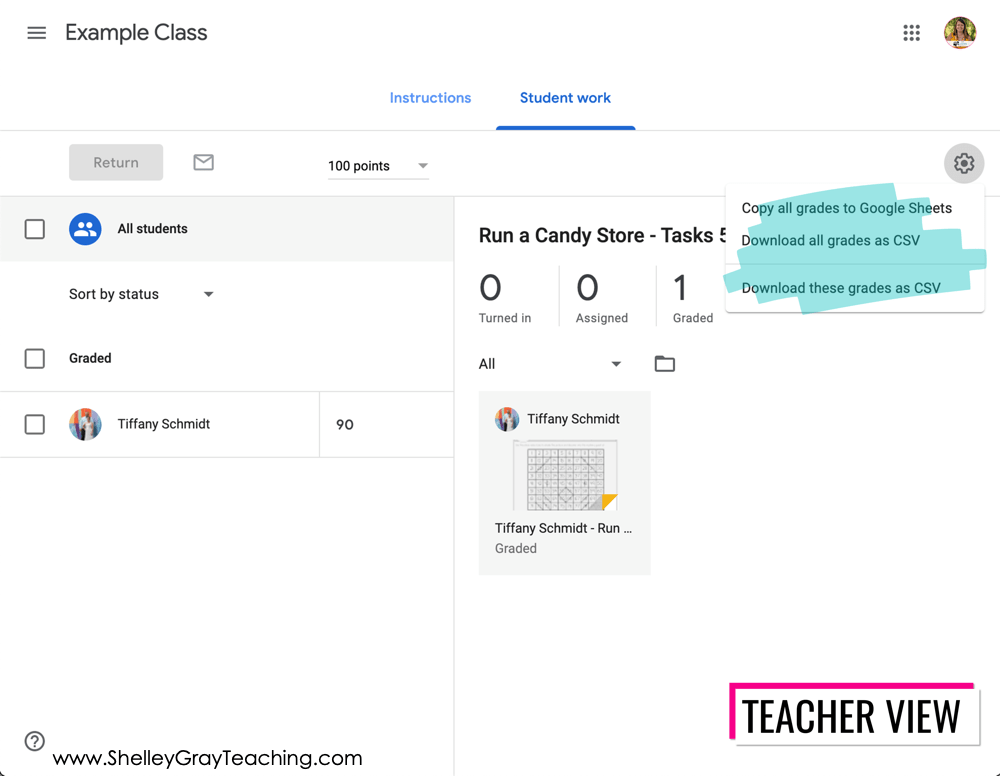
Back to the teacher’s view.
When you click on an assignment, you can see which students are working on their assignment, who has turned their work in, and after the due date, who’s is missing.

Click on a student’s assignment to view their work. You can add private comments, a grade, and even add comments on specific parts of their work if you wish.
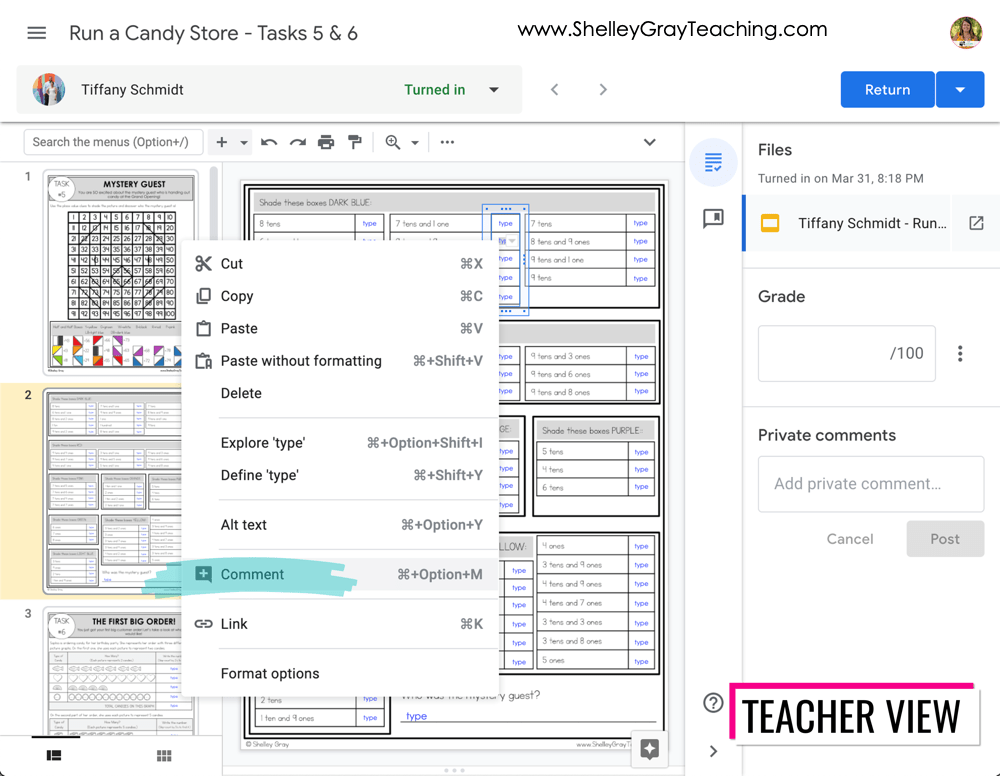
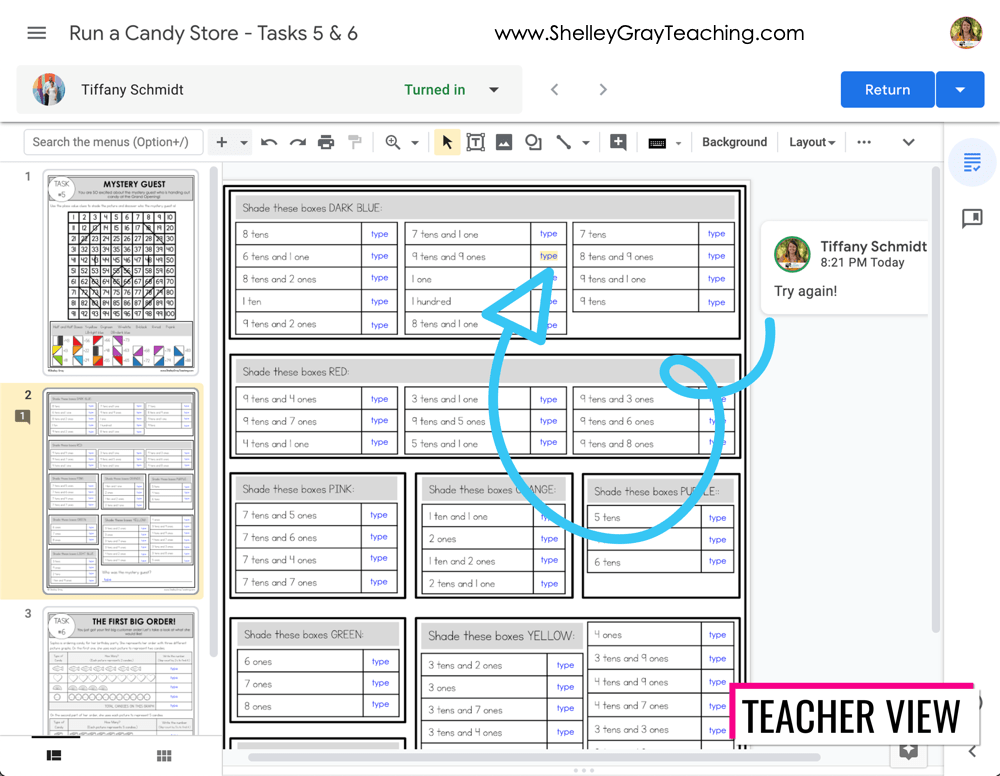
Highlight some text, right-click on it, and select COMMENT. This will allow you to give specific feedback on parts of a student’s work. I love this feature! It is such a helpful tool instead of just marking wrong or correcting something for the student without letting them know why. Leave them a note and let them know how they can correct their work. They will see any comments you leave off the side of the page when they open the file. When you hover over the comment, it shows where the highlight is on the page.
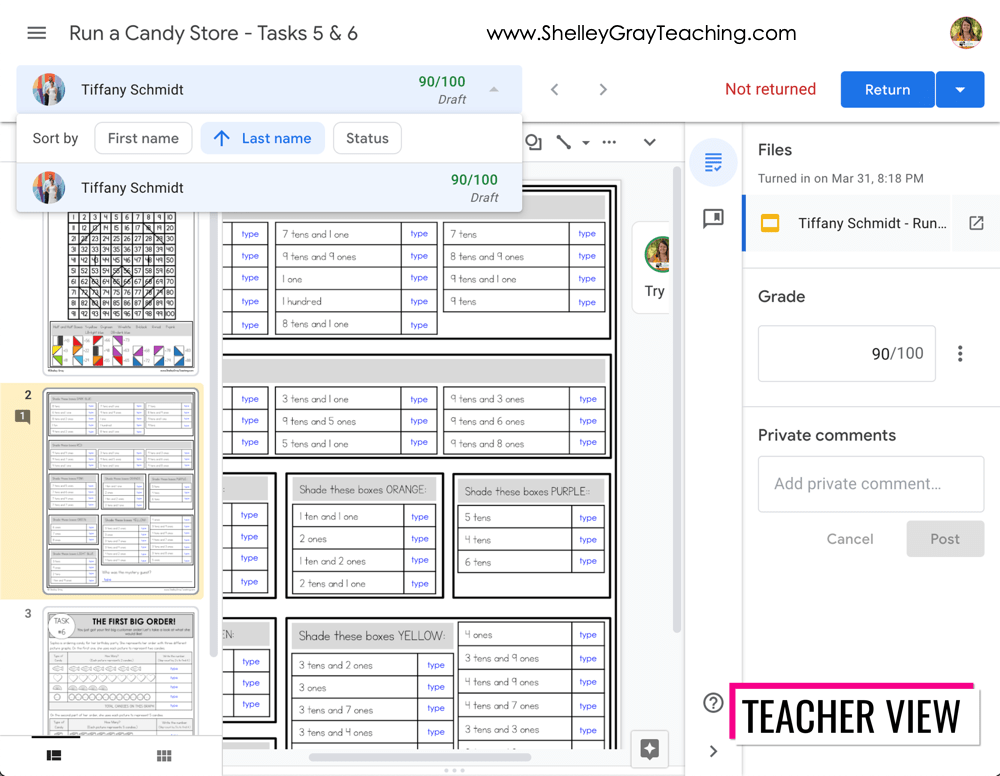
Another thing you can do while grading is go from one assignment to the next without closing the tab. Click the student name at the top and you’ll see a list of all students. You can see work that is in progress, too.
Some Features You Should Know About
You can export your grades from any assignment. Most grading software allows you to import CSV (spreadsheet) files to add grades. This is very helpful. You can also copy your grades to Google Sheets if you keep your grades digitally but not in a software system.
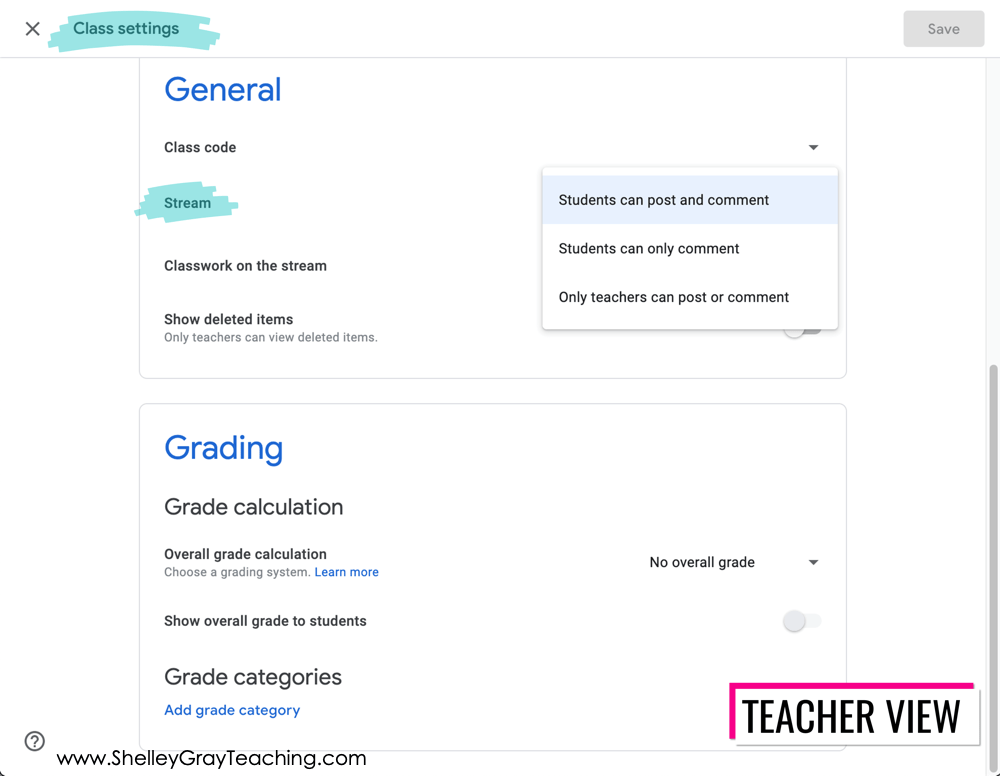
From the main Stream of your Classroom, you can click the gear icon in the top right corner. This will open your CLASS SETTINGS. If you don’t want students to be able to openly comment to each other, you can change that setting here.
Students can resubmit work if needed. I love this feature for writing assignments. You can help a student revise their work with feedback comments and they can resubmit the final copy to you.
Differentiate assignments for students by creating different versions of the files. Only the student who the file is assigned to can see their work – no one else in the class can, so they won’t even know they have a different assignment.
If you need more help with Google Classroom, their support page is really great.
Options for Assigning Digitally without Google Classroom
While I have not used any of these learning platforms with Google Drive myself, I did some research to see what highly rated learning platforms support Google Drive use. If you need specifics on any of these platforms and how to use Google Slides with them, simply do a Google search for [learning platform name] Google Slides. I found a lot of information this way.
A Note About Using Purchased Files Online
When using any files that you’ve purchased from TpT (or anywhere on the internet), you need to make sure you read the terms of use. Most authors will not allow you to share files online in a way that they can be accessed freely by the public. Using Google Classroom is okay because only your students access those files. These other learning platforms are set up the same way. If your students have an account that they log in with, then usually that platform is secure and not accessible by the general public.
Do You Have Another Question About Google Classroom or Google Slides?
If there is something that I didn’t cover in this blog post that you still have a question about, please leave a comment below and I’d be happy to get back to you with an answer.
LOOKING FOR DIGITAL RESOURCES FOR DISTANCE LEARNING? FIND THEM HERE.
PIN FOR LATER
3 Comments
This is so very helpful. Thank you
so much for making this new adventure a bit more manageable for this not-so-tech-savvy veteran teacher!
I’m so glad that the information helped you make a stressful time more manageable.
What a concise overview of how to do this! The best I’ve seen so far since this pandemic started! Even though I’m quite versed in Google Classroom, I like to read these types of posts to maybe catch a trick or two. Great job!