Rounding numbers is a tricky concept for many kids. It can be somewhat abstract and a difficult concept to grasp. If there is one thing I’ve learned over the years, it’s that no one strategy works for every student. Concepts often need to be taught and reinforced in multiple ways to reach every student in the classroom.
When it comes to rounding numbers, I believe in a conceptual approach where students are taught to find the proximity of the number being rounded to the benchmark numbers and midpoints. This is one way to ensure that students truly understand what rounding means – rather than simply memorizing a rhyme or the steps to a procedure.
Related: Not Sure How to Teach Rounding Numbers? Make it Hands On! (Try This)
However, I also understand that students need to see concepts in different ways. In this post, my guest writer Katie has given a breakdown of how she uses Rounding Mountain in her classroom in order to help students visualize the rounding process. This is a visual that may give some students the “a-ha” moment with rounding, and we can use it to connect their new understanding to rounding on a number line.
Rounding mountain can be a helpful visual for students; however, remember to use this to support your students’ understanding of benchmark numbers and midpoints, not to replace it.
If you’ve taught elementary-level math, then you probably have taught some form of rounding. Rounding is important in elementary math because it helps our students build their sense of place value.
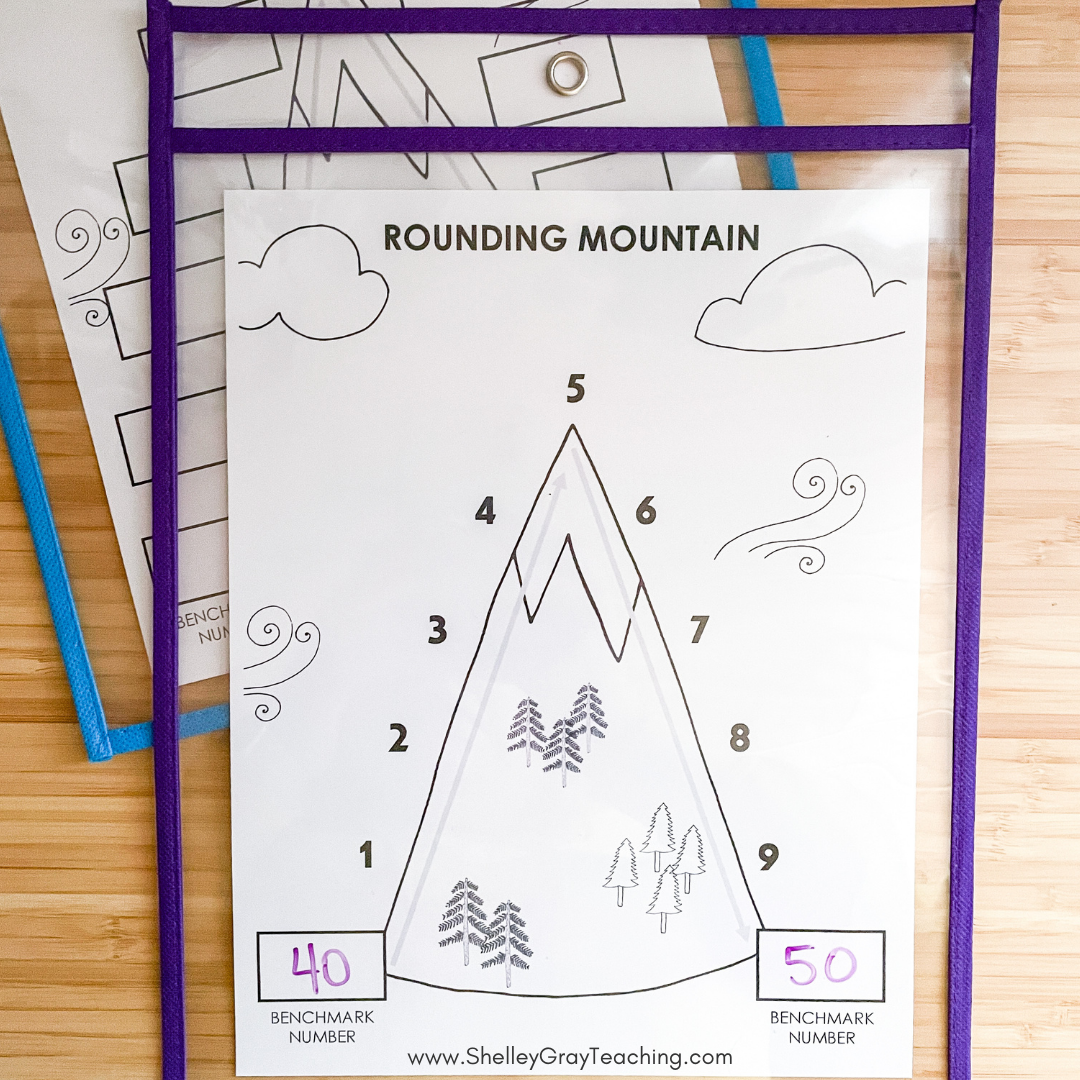
When you round a number, you determine which benchmark number (ten, hundred, thousand, hundred thousand, million, etc.) a number is closest to.
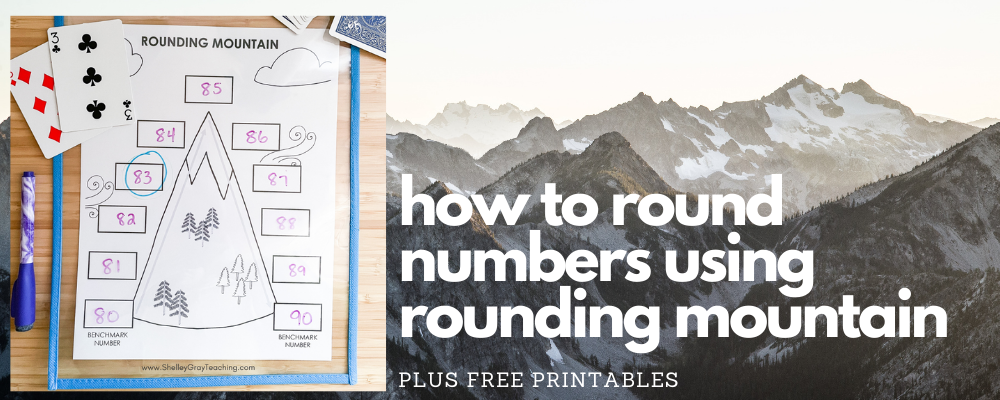
I like to teach my students different strategies when I review or introduce this topic to them. One of the most popular ways that my students have enjoyed learning and using has been the rounding mountain.
What is the rounding mountain and why is it beneficial?
The rounding mountain is a visualization tool that can help your students understand whether a number should round up or round down. As you can see in the example above, 41, 42, 43, and 44 would round down to 40. 45, 46, 47, 48, and 49 would round up to 50.
My students have always enjoyed this strategy because it allows them to “practice climbing up and down the mountain.” They enjoy making it a game or a competition. The more ways we can visualize and practice a concept, the better!
Related: Quick and Easy Place Value Activities (Try These to Boost Number Sense!)
How to Use the Rounding Mountain
- Pass out a chart or allow your students to use an anchor chart on a stand or whiteboard. I like to laminate my anchor charts so they can be used year after year.
- Decide which place you are rounding to, for example, the nearest ten.
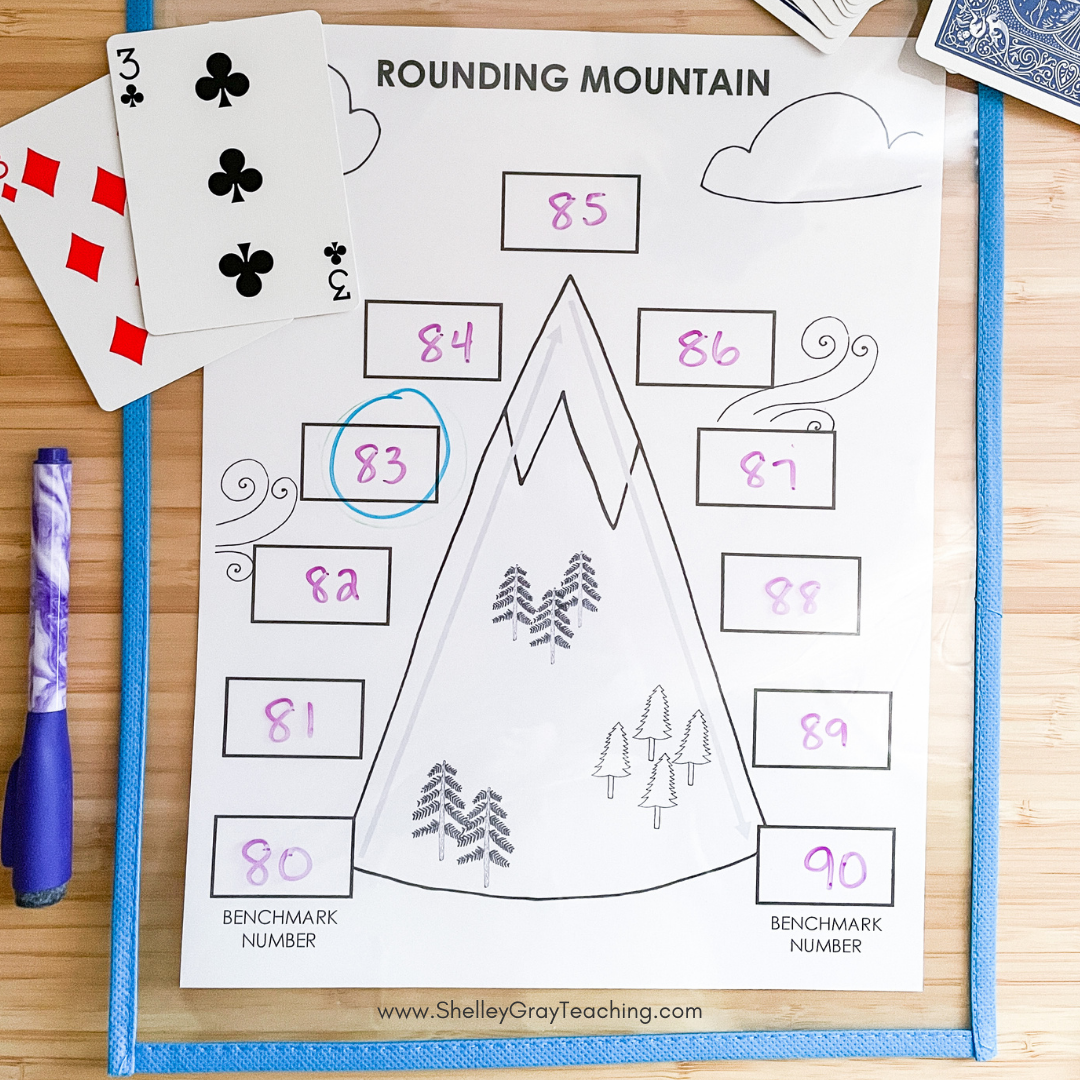
- Give your students a number. In this example, we will use 43. Have them identify the benchmark numbers. These are the next lowest ten and the next greatest ten. In this case the benchmark numbers are 40 and 50. Students can use sticky notes to place these benchmarks on either side of the chart, or write with dry-erase markers.
- If we are rounding 43 to the nearest ten, we will underline the number in the tens place. Then we will circle the number to the right (in this case, the 3).
- The circled number will determine whether we round down or round up. In this case, we round down to 40.
This can easily be used as a partner activity to encourage collaboration and teamwork. Have students take turns and double-check each others’ rounding.
IMPORTANT: Make sure your students understand WHY they are underlining the number in the tens place, and circling the number to the right. We want to ensure that students understand rather than follow a series of steps with no real understanding. Ask questions like, “Why does the circled number determine if we round up or down?” or “What are some options the circled digit could be if we rounded up to 50?”
Helping Students Make Connections
One of the most important aspects of helping students develop a deep understanding in math is to help them make connections between concepts. If you decide to use the Rounding Mountain visual in your classroom, ensure that you are helping students make connections to a number line. Here are some ideas:
- Ask, “How is our Rounding Mountain the same as a number line? How is it different?”
- Discuss with students: “Look at our Rounding Mountain. Now look at this number line. What do you notice? What do you wonder?”
- Refer to the numbers at the base of the mountain (ex. 40, 50) as benchmark numbers, and the number at the peak of the mountain as the midpoint.
- If you are working with rounding to the nearest hundred, thousand, or ten thousand, ask: “Is there a way we could use the rounding mountain to round to these other place values?”
Free Rounding Mountain Printables
If you’re interested in using Rounding Mountain as an activity to supplement your students’ understanding of rounding numbers, here are some free printables that might be useful for you!
More Rounding Resources
The rounding mountain activity above can easily be connected to rounding on a number line. When students round on a number line, they use their knowledge of benchmark numbers and midpoints to find which ten (or hundred, thousand, etc.) a number is closest to.
Here are some other resources that will be helpful as you teach your students how to round on a number line:
- Rounding to the Nearest Ten (within 100) worksheets
- Rounding to the Nearest Ten and Hundred (within 1,000) worksheets
- Rounding to the Nearest Ten, Hundred, Thousand (within 10,000) worksheets
- Rounding: Digital Mystery Pictures