
“Four or less, let it rest. Five or more, add one more.” Right? Wrong!! Do you find that rounding is confusing for your students? Do you find that many students don’t really seem to “get” what it means? It’s time to stop teaching the cute rounding rhymes and tricks and teach in a way that promotes real understanding.
If you are teaching rounding, this article is going to include everything you need to teach it in a way that promotes conceptual understanding. Let’s go deep with this concept so students are building number sense that will transfer to other concepts rather than simply memorizing a rhyme.
First, let’s take at how NOT to introduce rounding to your students. The whiteboard below shows a common way of teaching rounding. We look at the numbers, say a rhyme in our heads, and get a correct answer.
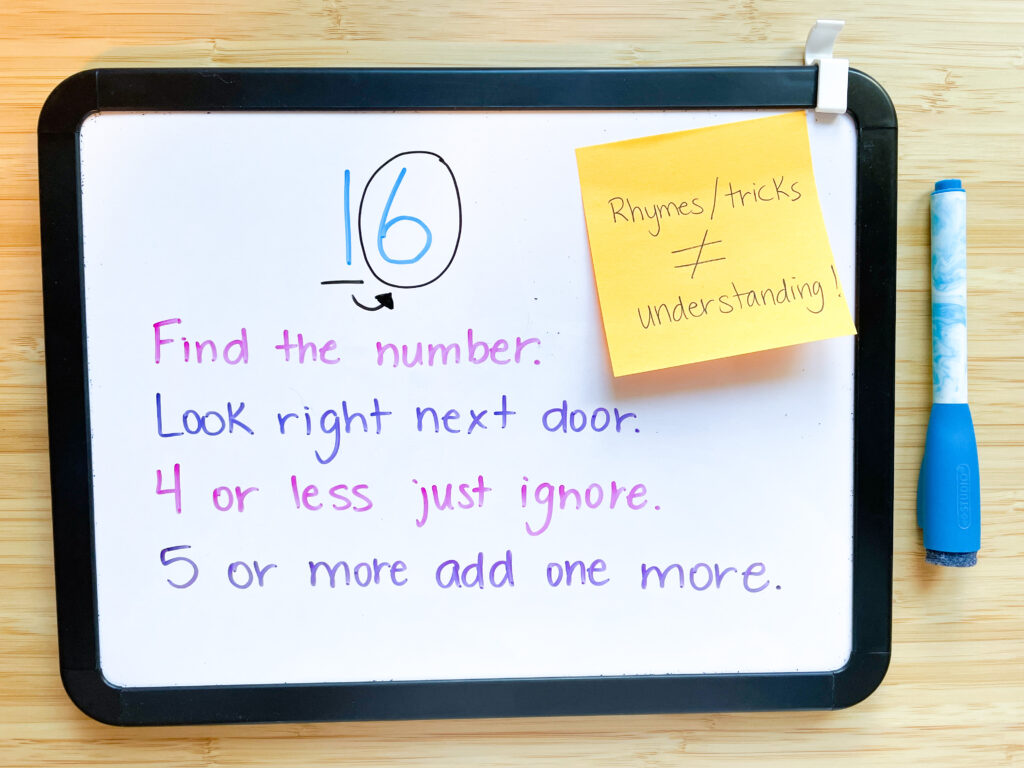
But let’s think about this approach.
- Is this meaningful to students? Do they actually understand what rounding is?
- Does this approach help them build deep understanding of the concept of rounding?
- Is the focus on understanding? Or is the focus on getting a correct answer?
- Does this rhyme transfer to other areas of mathematics and help students build their overall number sense?
Now let’s contrast this with a different approach. This time, let’s use a number line and let’s ask ourselves the same questions:
- Is this meaningful to students? Do they actually understand what rounding is?
- Does this approach help them build deep understanding of the concept of rounding?
- Is the focus on understanding? Or is the focus on getting a correct answer?
- Does this concept transfer to other areas of mathematics and help students build their overall number sense?
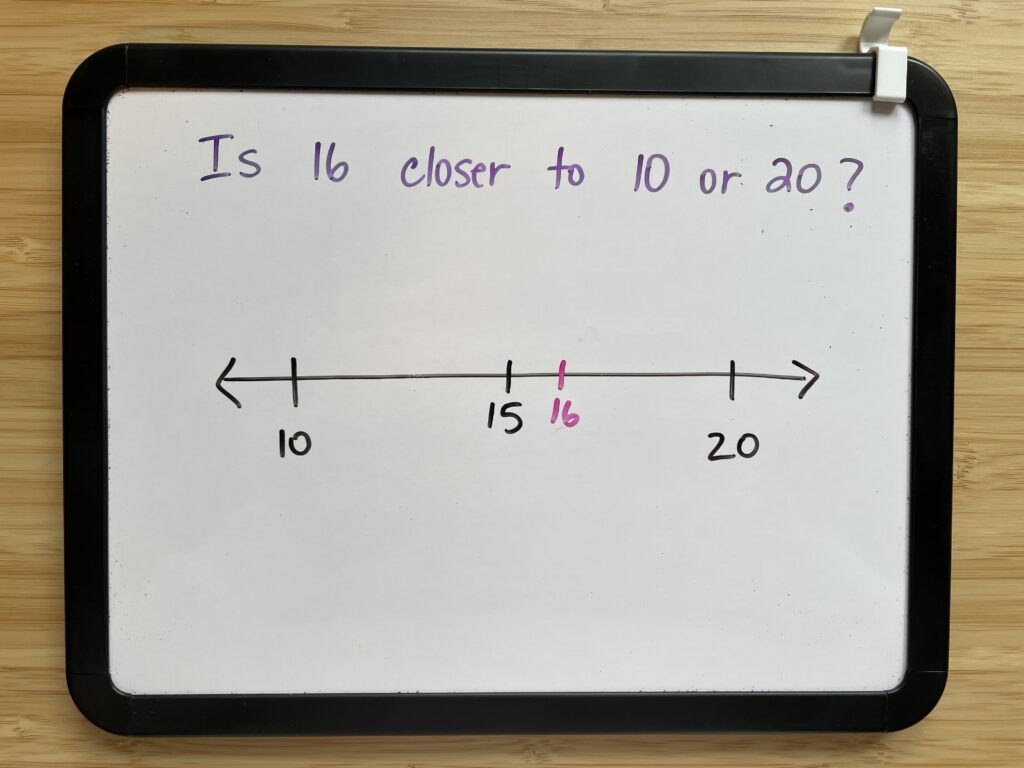
When we think about it in this way, it’s clear that we must stop teaching the cute rounding rhymes, and start teaching actual math. In the words of Nicki Newton, “Don’t teach tricks. Teach math. It’s easier!”
So how do we accomplish this? Where do we begin?
HANDS-ON ACTIVITIES
If you use the CRA Model in your math classroom (highly encouraged), you know how important it is to begin teaching any concept in a concrete way that students can visualize. In this concrete phase, students are using physical objects that they can manipulate. This stage is where students are rapidly building their understanding of a concept.
So often when we teach rounding, we begin with using the actual digits of a number, and introducing them to a rhyme or rule. But this does not help them understand what rounding really means. This does not enable them to build the connections that are so important for true understanding and number sense development.
When I am brainstorming concrete activities, I am asking myself a couple of questions.
- How can this concept be visualized without any digits involved?
- How can we eventually bridge this concrete representation to a more abstract representation?
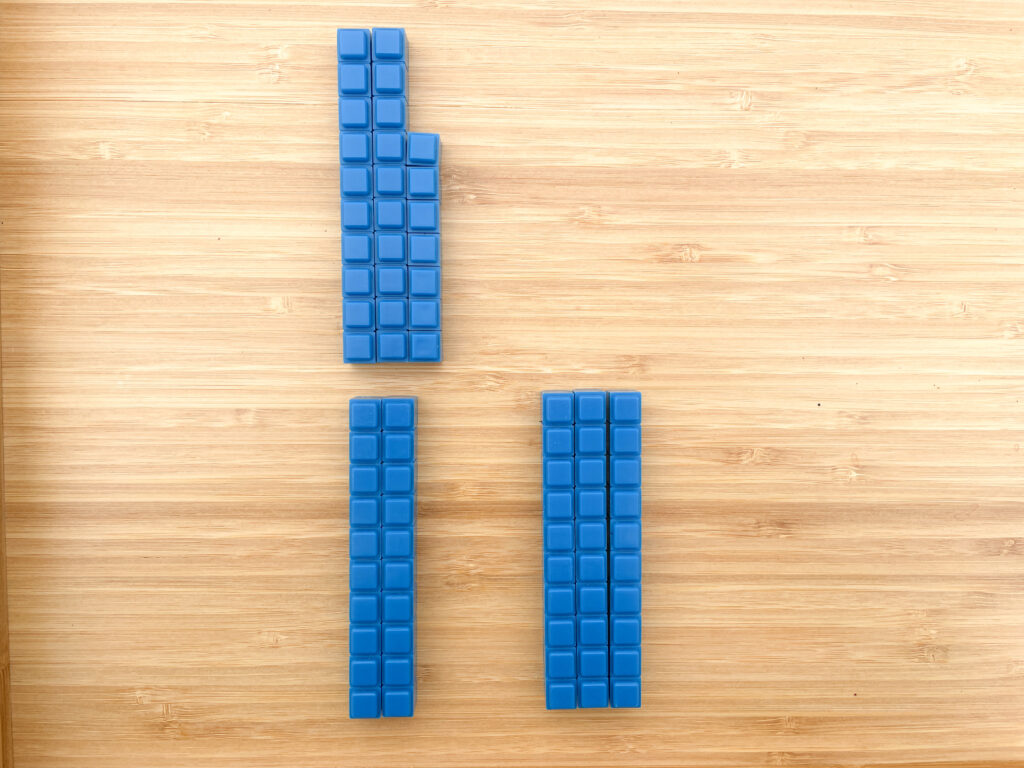
Using Base Ten Blocks for Rounding Numbers
Base ten blocks are an excellent visual for rounding numbers because most students are already familiar with them. Here we are looking at the number 27. First, we can ask which tens 27 comes between. In this case, it comes between 20 and 30. Now we need to figure out which ten it is closer to: 20 or 30. When we can see what 27 looks like, it’s easy to see that 27 is closer to 30 than it is to 20.
Notice that we have not even used the term “rounding” yet – we are simply focusing on which ten each number is closest to.
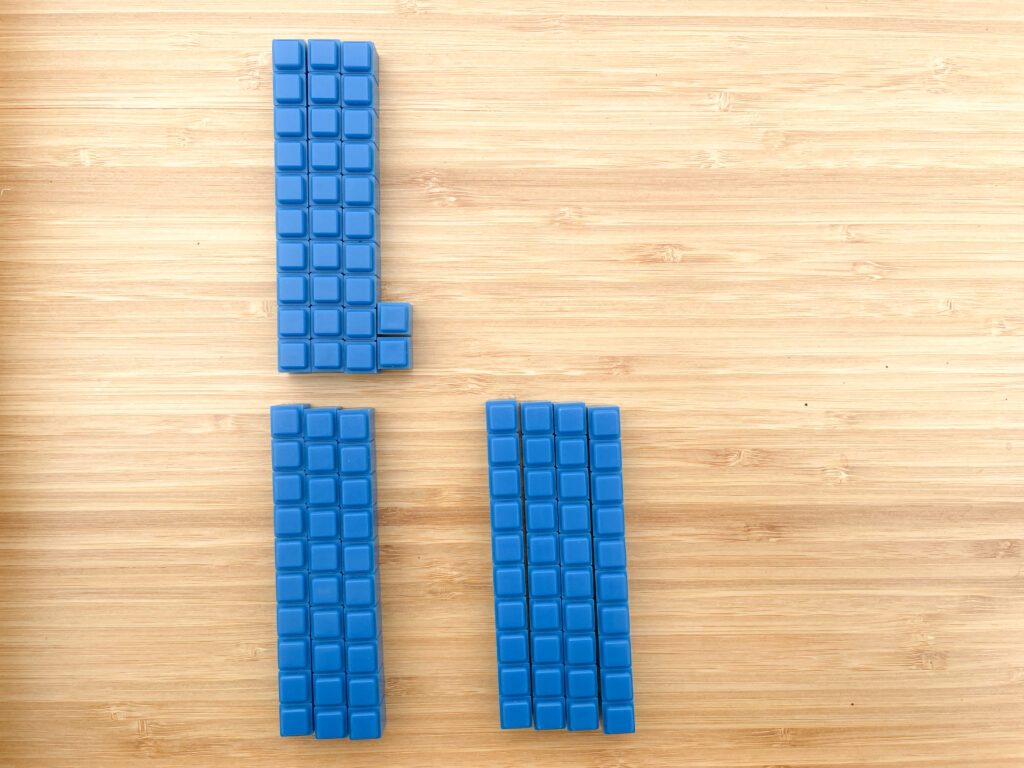
Here’s another example with the number 32. We know that 32 comes between 30 and 40. When we can see it built with base ten blocks, it’s easy to see that 32 is closer to 30 than it is to 40.
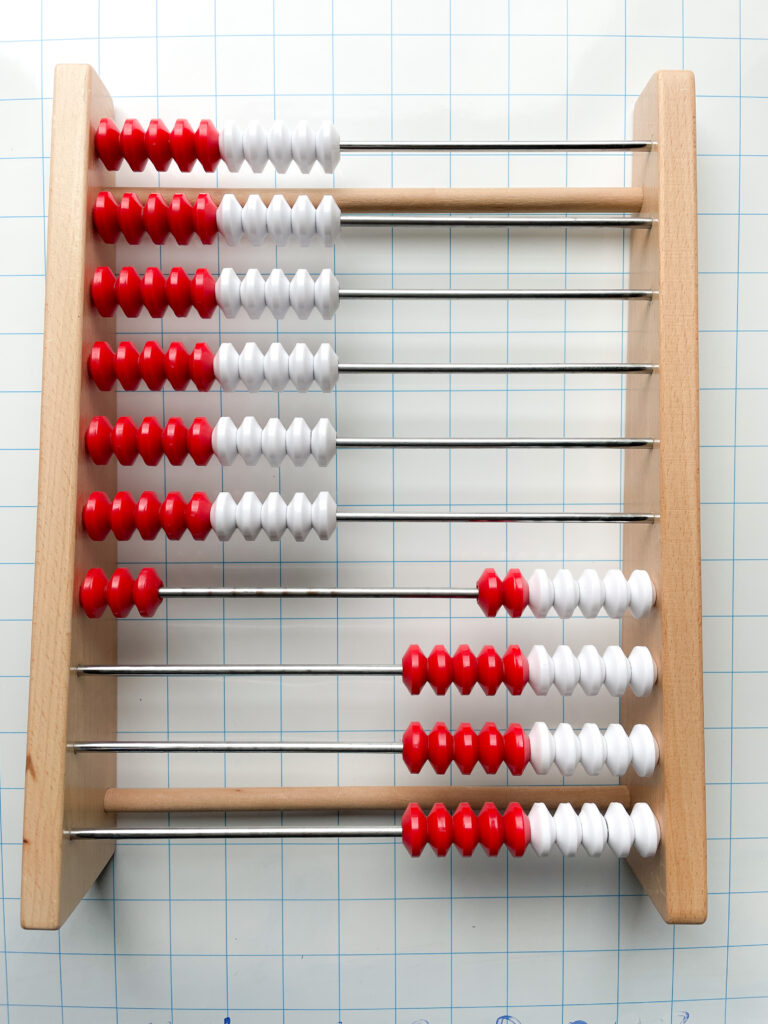
Using A Rekenrek (Number Rack) for Rounding Numbers
Another common manipulative that we can use to visualize closeness to a number is a rekenrek. Again, we are focusing simply on building numbers and figuring out which ten they are closest to. In this example we have built 47. We know that 47 is between 40 and 50. This visual helps us see that 47 is closer to 50 than it is to 40.

In this example we can see that 63 is closer to 60 than it is to 70.
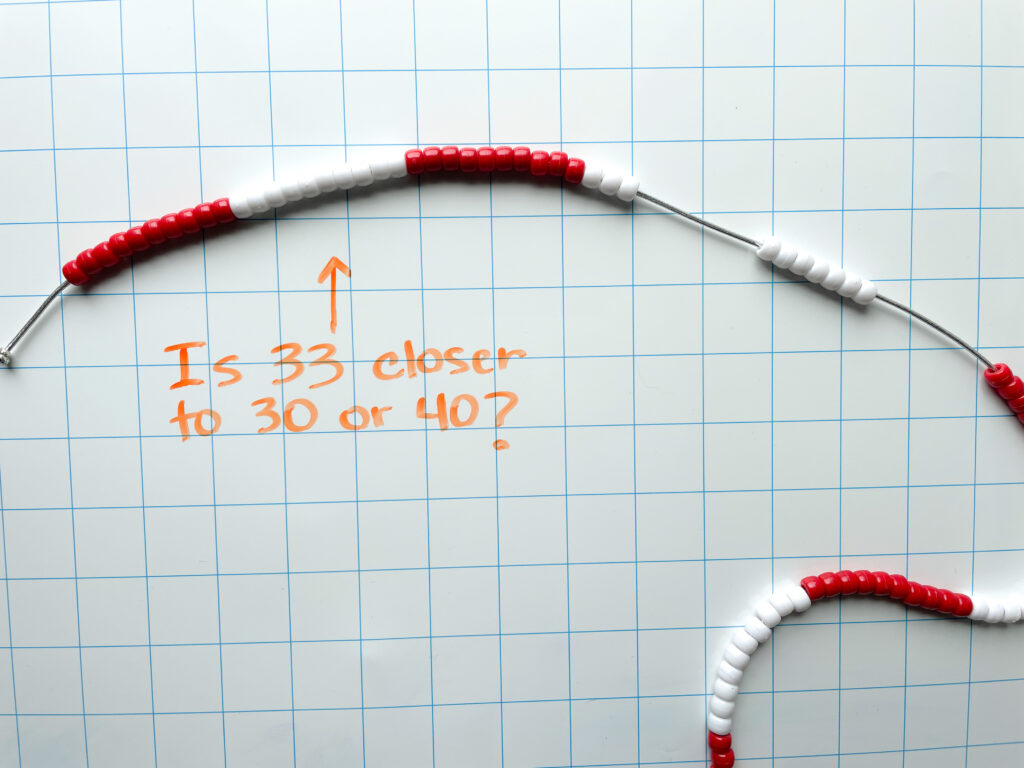
Using A Beaded Number Line (Bead String) for Rounding Numbers
A beaded number line is a fantastic tool to add to your manipulative collection. In this example we see the number 33, and can visualize it as being between 30 and 40. It’s easy to see that 33 is closer to 30 than it is to 40. I love beaded number lines because they are a wonderful transition to a drawing of a number line, which we will take a look at in the next section.
Incorporating Representational Models
The number line is a powerful representational model for rounding numbers. It helps students visualize which ten (or hundred or thousand) a number is closest to. In this example, we are making connections between the concrete representation of 27 and the representation of 27 on the number line.
How to Use a Number Line To Teach Rounding
Number lines are powerful for so many concepts, and rounding numbers is no exception. The number line is a MUST-USE tool for teaching students how to round.
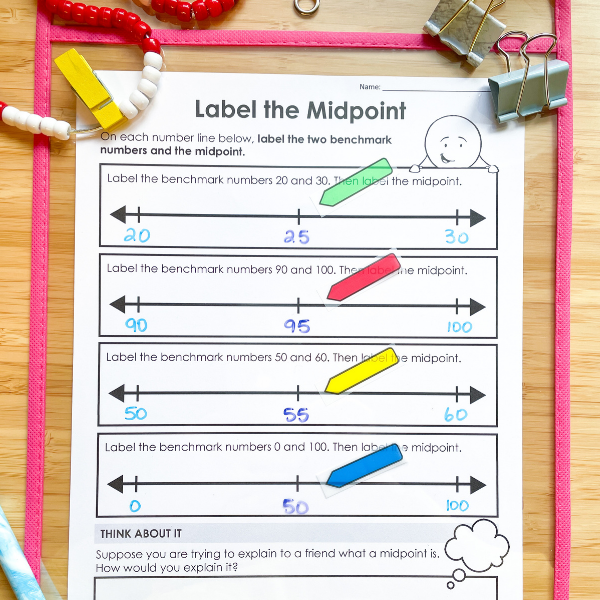
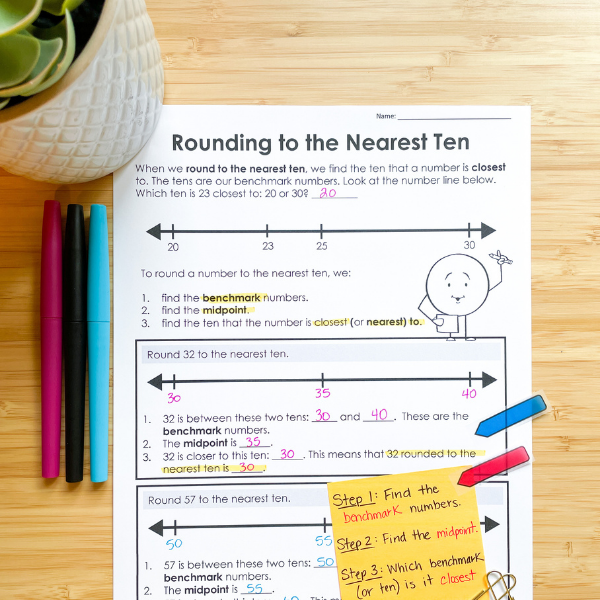
The first step in using a number line to round is to identify the benchmark numbers. But what are benchmark numbers? A benchmark number is a reference point. It is a “friendly” number that is easy to work with. Numbers like 10, 20, 25, 30, 50, 75 or 100 can be benchmark numbers. When we use benchmark numbers for rounding to the nearest ten, our benchmarks are the ten that is less than the number we are working with, and the ten that is greater than the number we are working with.
Once we know the benchmark numbers, we can find the midpoint. This is the halfway point between the two benchmark numbers. For example, 25 is the midpoint between 20 and 30. Or 95 is the midpoint between 90 and 100. (See the resource pictured here.)
Now that we have the benchmark numbers and midpoint, we can place the number on the number line. Let’s suppose we are rounding 84 to the nearest ten. Our benchmarks are 80 and 90. Our midpoint is 85. When we place 84 on the number line, we can easily see that it is closer to 80 than to 90. (See the resource pictured here.)
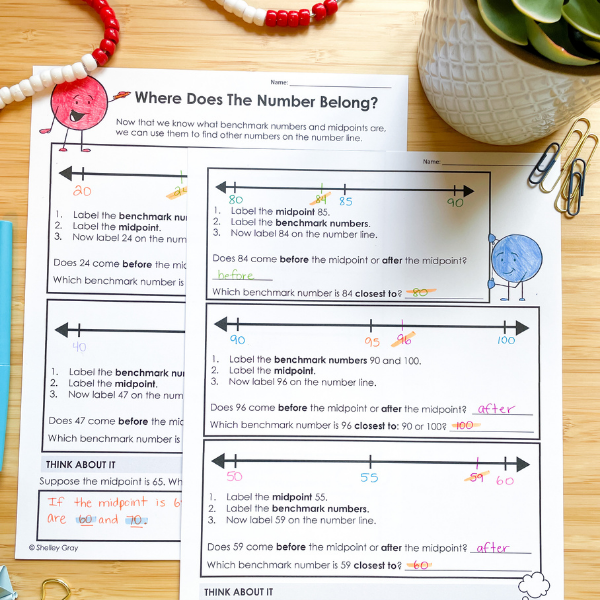
Number lines provide students with a visual. They make rounding easy to see, and not so abstract. When we round, instead of circling the digit, looking at the digit to the right, and then thinking of a rhyme like, “Four or less, let it rest. Five or more, add one more,” we can think about rounding in a conceptual way – a way that builds deep understanding and helps students understand what is actually happening when we round. (See the resource pictured here.)
Going Abstract
Once your students have built the conceptual understanding that is necessary, they will be able to move on to rounding in a more abstract way – without the tools and visuals. But this doesn’t mean that you stop using them! It’s a good idea to always come back to multiple representations of a concept. Even when students are comfortable with rounding, getting them to show their thinking on a number line can be valuable! The more connections we can make between concrete, representational, and abstract – the better!
Summary
To summarize, here are a few tips as you decide how to teach rounding in your classroom:
- Ditch the tricks! Teach math instead.
- Begin with concrete materials, and then help students make connections to more abstract models.
- Use number lines. These are a powerful tool for so many concepts – rounding included.
- Remember that number lines and concrete materials aren’t reserved for students who need intervention! These are powerful tools that all your students should be comfortable with.
Need Additional Support?
If you’d like additional support with teaching and reinforcing rounding to the nearest ten, try these engaging rounding activities:
- Rounding on a Number Line (nearest ten, within 100)
- Digital Rounding Practice (for rounding to the nearest ten)
- Rounding to the Nearest Ten Task Cards (for math stations or an “around the room” gallery walk activity)
- Rounding to the Nearest Ten Mystery Pictures
Here’s some additional support for rounding within 1,000:
One Comment
Great points made on teaching rounding.